


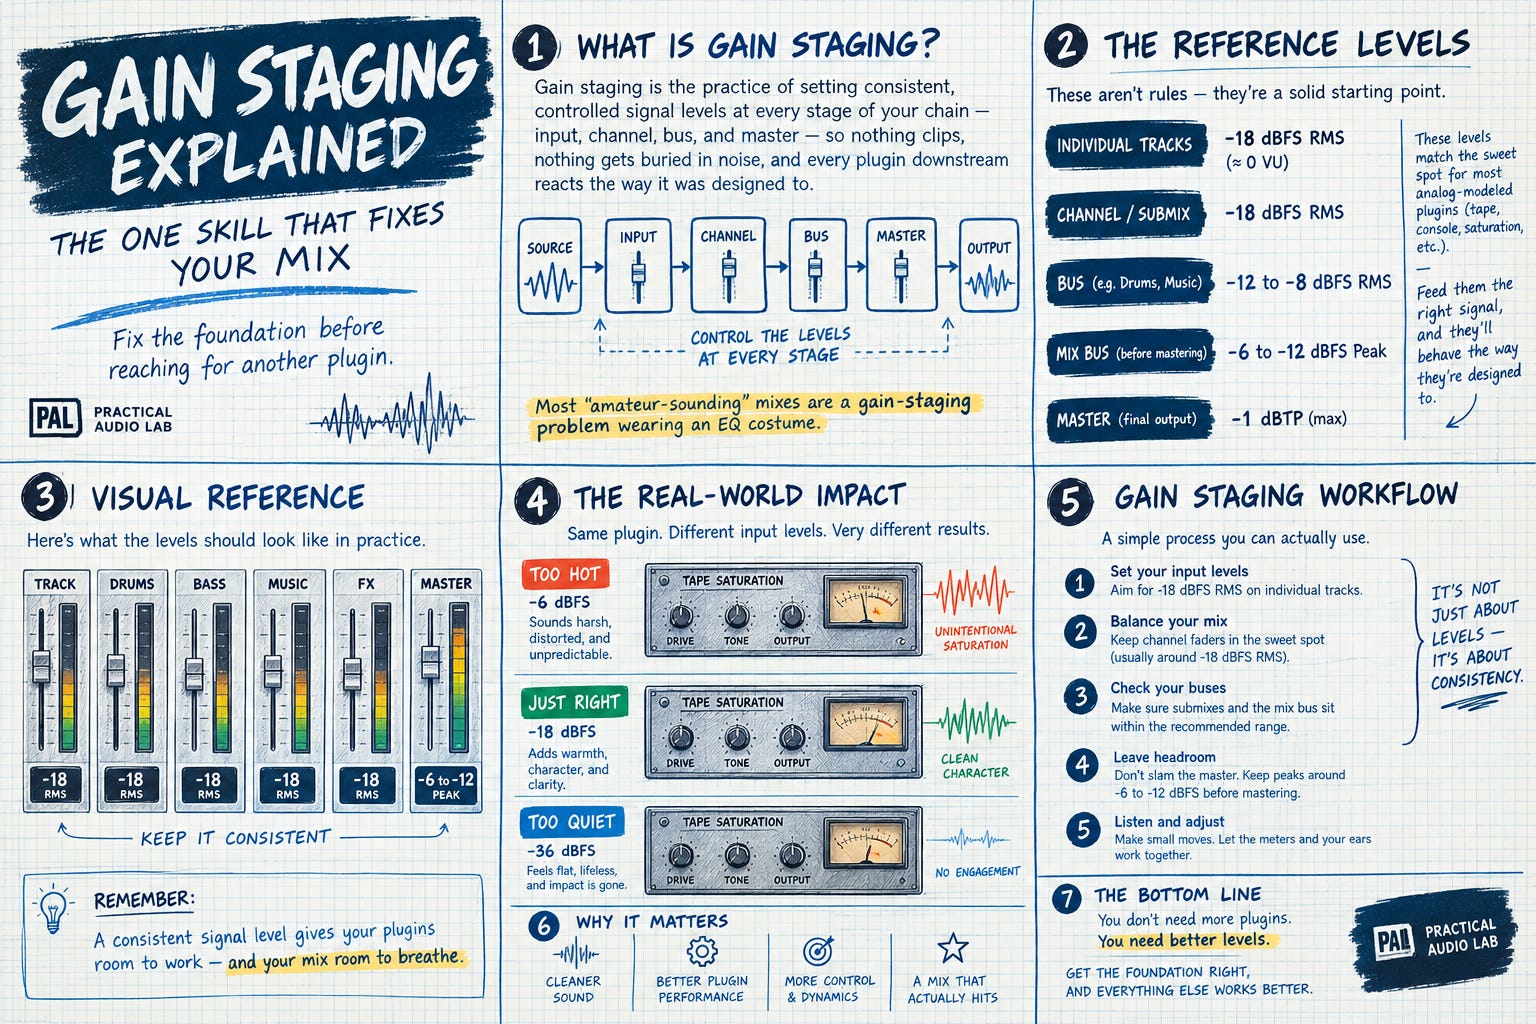
Gain Staging Explained: The One Skill That Fixes Your Mix
Fix the foundation before reaching for another plugin
This became real for me when I finally gave up trying to force the compressor on my MPC to behave like I wanted it to. No matter how much you think that your’re opoerating at 32 bit, it doesn tmatter. The plugins are coded a specifc way. WHen going back to the basics and just making sure my levels were set right , everying changed. I was no longer fighting the flat sound o over compression, instead I had to make different , yet better choices for my mix giving me space, clarity and ultimately the punch i was looking for.
TLDR
Gain staging is the practice of setting consistent, controlled signal levels at every stage of your chain — input, channel, bus, and master — so nothing clips, nothing gets buried in noise, and every plugin downstream reacts the way it was designed to. Most “amateur-sounding” mixes are a gain-staging problem wearing an EQ costume.
Why Your Mix Sounds Amateur Even Though Your Plugins Are Good
It’s a familiar spiral: the mix isn’t hitting on sh*t, so you reach for your favourite saturation plugin.
So after you’ve finished saturating the crap out of the entire mix (and THEN the kick drum) , you add another limiter on the master, after your clipper.
Still flat, so you try a different EQ, a different reverb, a “mix bus glue” chain someone recommended in a forum.
Nine times out of ten, none of that is the actual problem and if anything is adding to the chaos.
You more than likely need to re-visit the basics.
If the signal feeding those plugins is too hot, too quiet, or wildly inconsistent from track to track, every plugin downstream is going to be adding to the problem.
A compressor set for a -18dB RMS level behaves completely differently when the actual average is -6dBFS.
A saturation plugin coded to add harmonic content at a certain drive level does nothing (or does too much) if you’re feeding it a too hot or too cold signal.
Gain staging isn’t separate from mixing. It’s the one decision that determines every other outcome downstream.
The Reference Point: Where Your Levels Should Actually Sit
Here’s a starting reference a lot of plugin engineers build around: aim for roughly -18 dBFS RMS on individual tracks, treating that as a “0 VU” equivalent.
That no arbitrary number either. Alot of analog modeled plugins are codedd for this due to the former ‘sweet spot’ of analog gear.
Most analog equipment will have a ‘sweet spot’ where the harmonics kick in in a musical way. having a relatively generic starting point like -18dBFS RMS or “0 VU” gives devlopers some room to emulate that ‘sweet spot’ with subtle gain changes in audio.
Feed them a nominal signal around that level, and they behave the way their analog references did: warm at the right drive, aggressive only when you push them there on purpose.
Now check this , same plugin, too hot unintentional digital saturation or distortion before you’ve made a single creative decision (which may be the sound you’re going for in some cases).
Too quiet, and a lot of that character never engages you’re left wondering why a plugin everyone raves about does nothing on your track, or simply throwing it on thinking that the UI is making your mix sound better.
Aslo be careful with too low of a signal when working with some analog modeled plugins, they may be adding small amounts of noise to the signal to emulate analog signal flow which can be amplified later in the mix. Again this could be the sound you're going for , so breaking the 'rules' is allowed. But this way at least you know what is happening with your audio.
From there, the same logic scales up: give yourself headroom at the bus level, and land your mix bus somewhere in the neighborhood of -6 to -12 dBFS peak before you touch mastering/finaliznig.
that extra headroom is not wasted space. Mastering plugins also have optimal input levels for the same reason channel strip , compression and tape emulation plugins do. The processing sounds better at optimal levels and gives you room to make more creative decisions.
Gain Staging on a Hardware-First Setup (MPC / Force)
Gain staging gets talked about almost entirely in ITB, DAW-based language — but if your workstation is an MPC or a Force, the stakes are a little different.
First, on the MPC X or AKai Force, you’re running a standalone architecture: locked to 44.1kHz, theres no infinite plugin-chain safety net and none of the “just bounce it again with more headroom” habit DAW users lean on.
EVEN thought they advertise this as 32bit, this is the SYSTEM architecture, not the plugins.
Most of the plugins still ahve an intenal fixed point.
That means the input level you commit to at the sampling or resampling stage matters more, not less. Print or record something too hot into the engine and you’re stuck with that decision.
Most of the tools a lot of hardware-first producers lean on IE tape saturation, console emulation, tube drive are voiced the same way as their DAW-plugin cousins: they expect a certain input level to sound the way they’re supposed to sound.
Gain staging on hardware isn’t more complicated. It’s just less forgiving. Even if your hardware has a build in DAW.
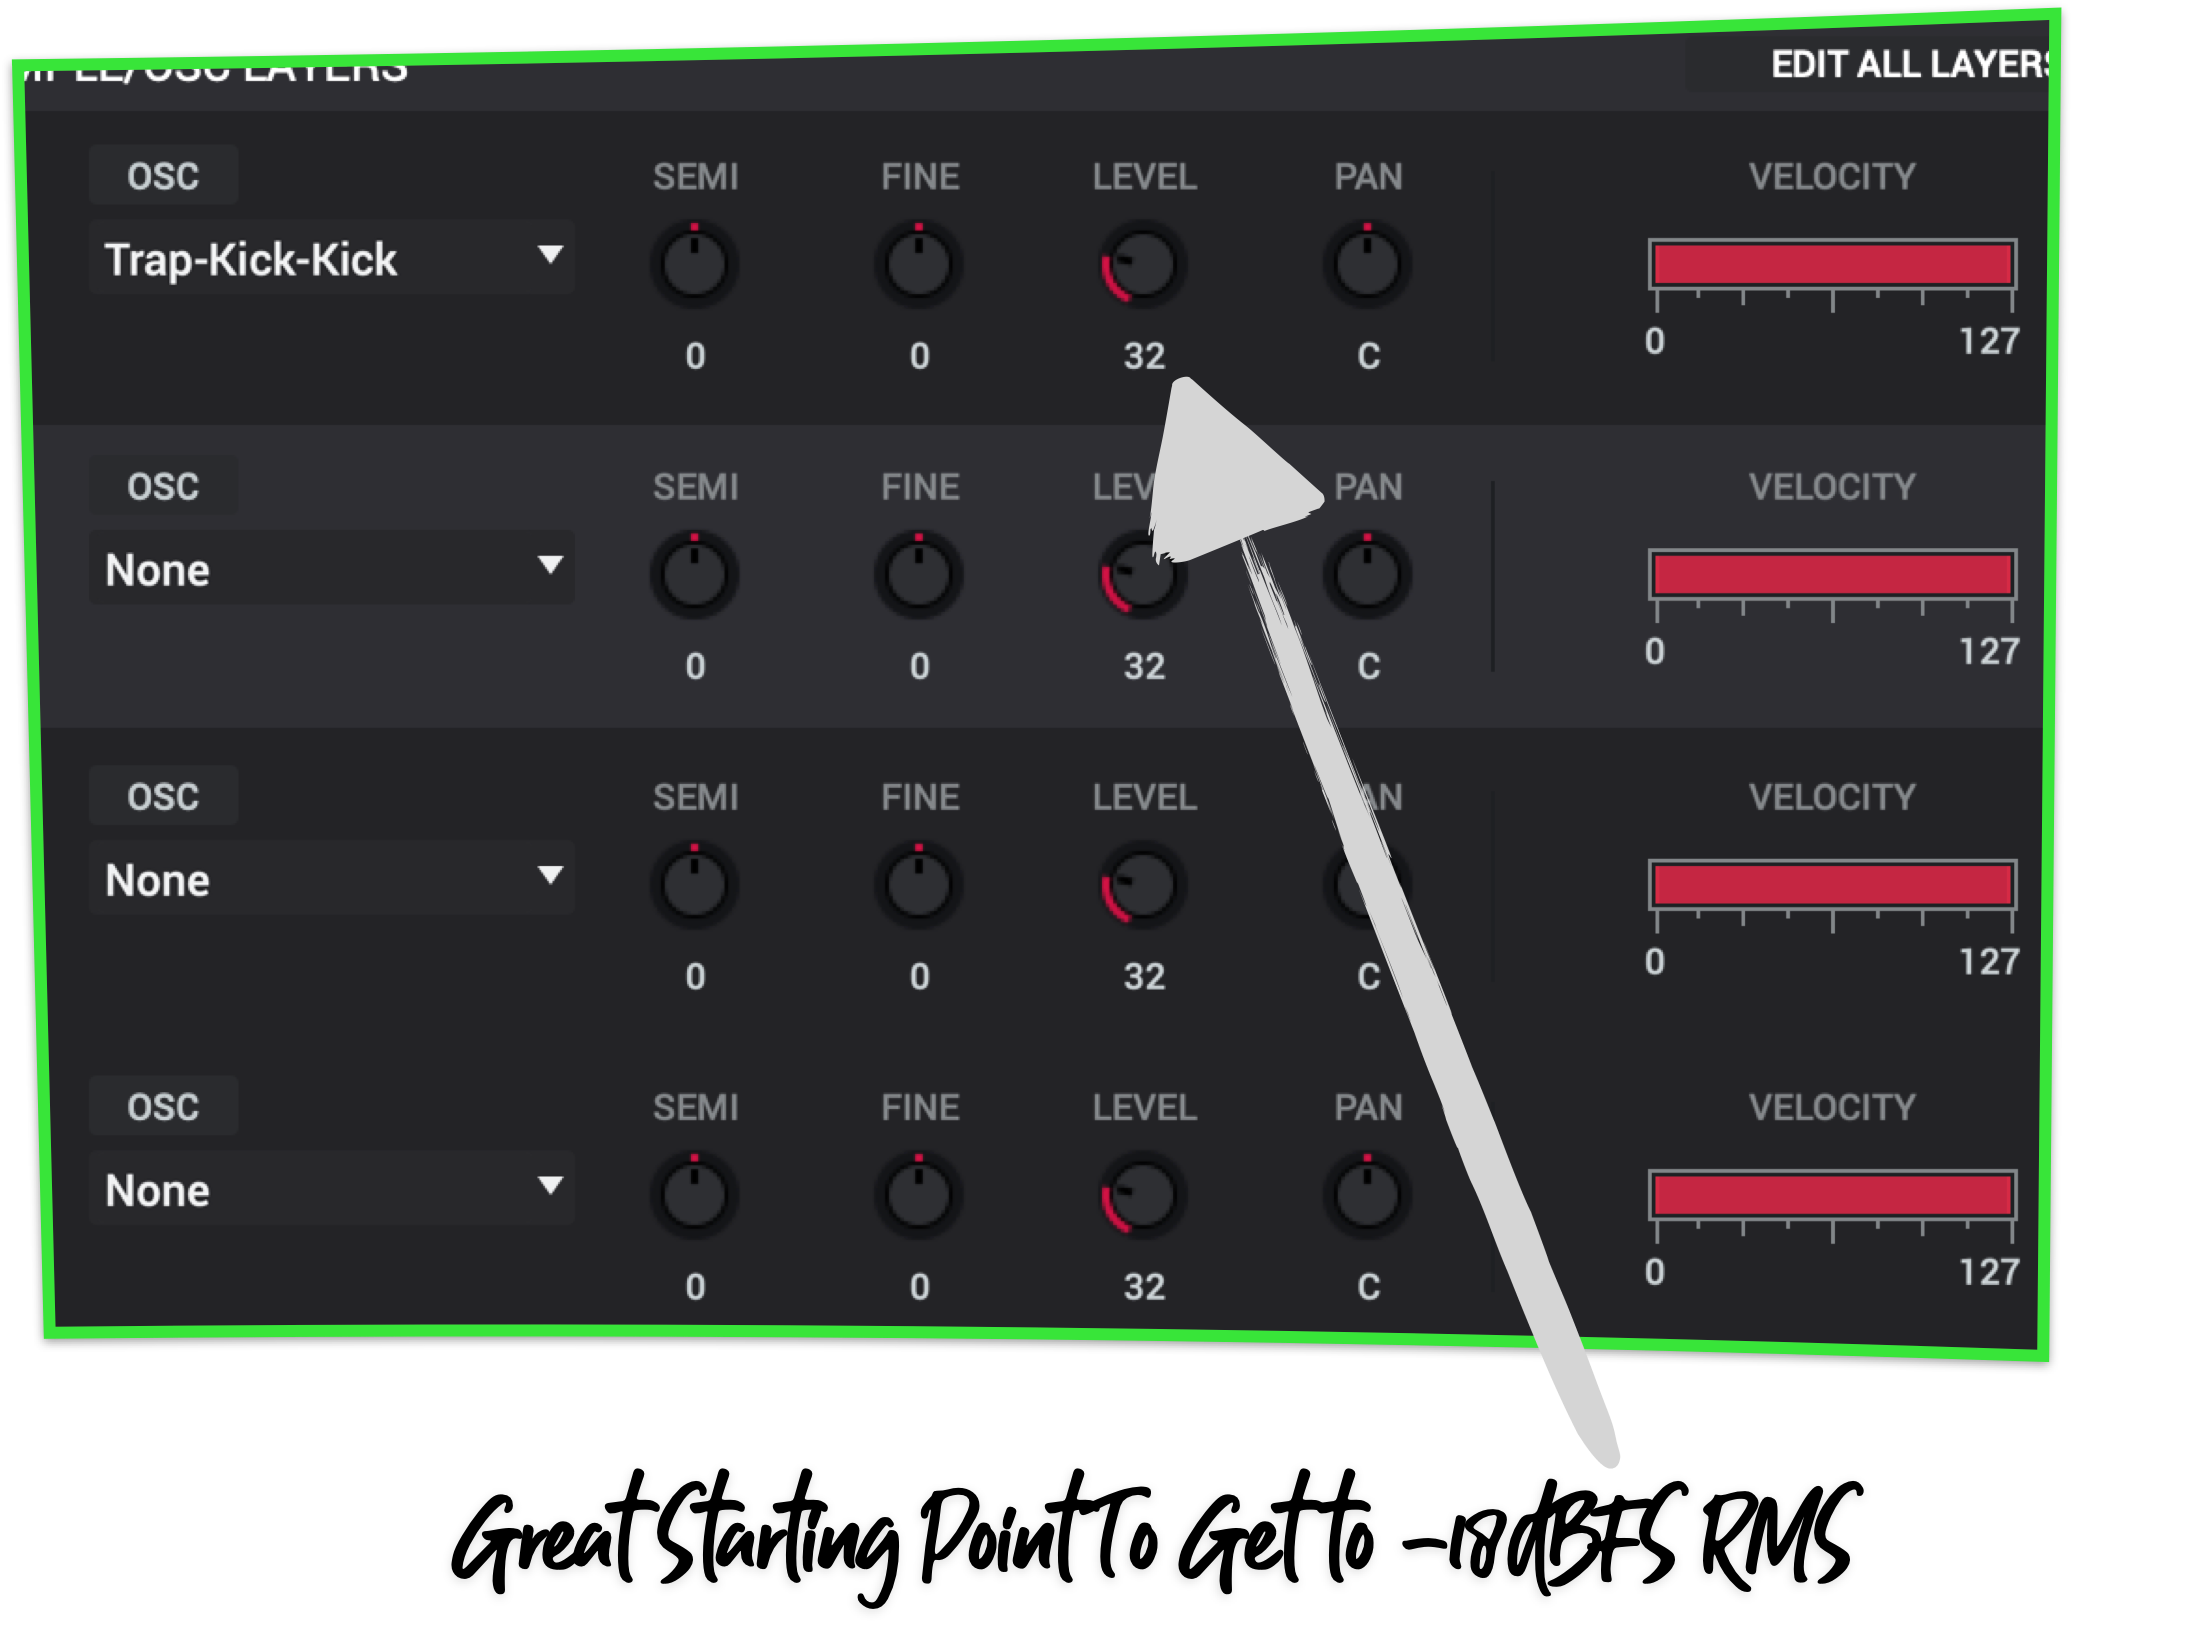
Inside of the MPC , before you get to the mixer fader therea ctually is another section that sets the sample volume and pan pre fader! Believe it or not this is the holy grail of gainstagng on the MPC standalone (minus using plugin instruments) and one simple move will make the entire track fit completely different. I’ve found that dropping the sample leve l for all pads to arond 32 instead of 127 will have most tracks peaking around the -18dB mark. Minus drums which may pieack at -12dB (which is okay) this single move will singlehandedly make everything fit. After adding plugins, just make sure nothing is adding additional gain (unless thats what you desire)
More Plugins Won’t Fix Bad Gain Staging
Heres the part that most popup plugin companies hate. fixing your mix usualy doesnt require much. Your DAW or whatever you’re building your tracks with already has most of the tools necesssary.
You dont need a new piece of gear or sample pack.
What you could fix today literally in the next 10 minutes is going back to a mix, with the faders you already have, and starting from the beginning.
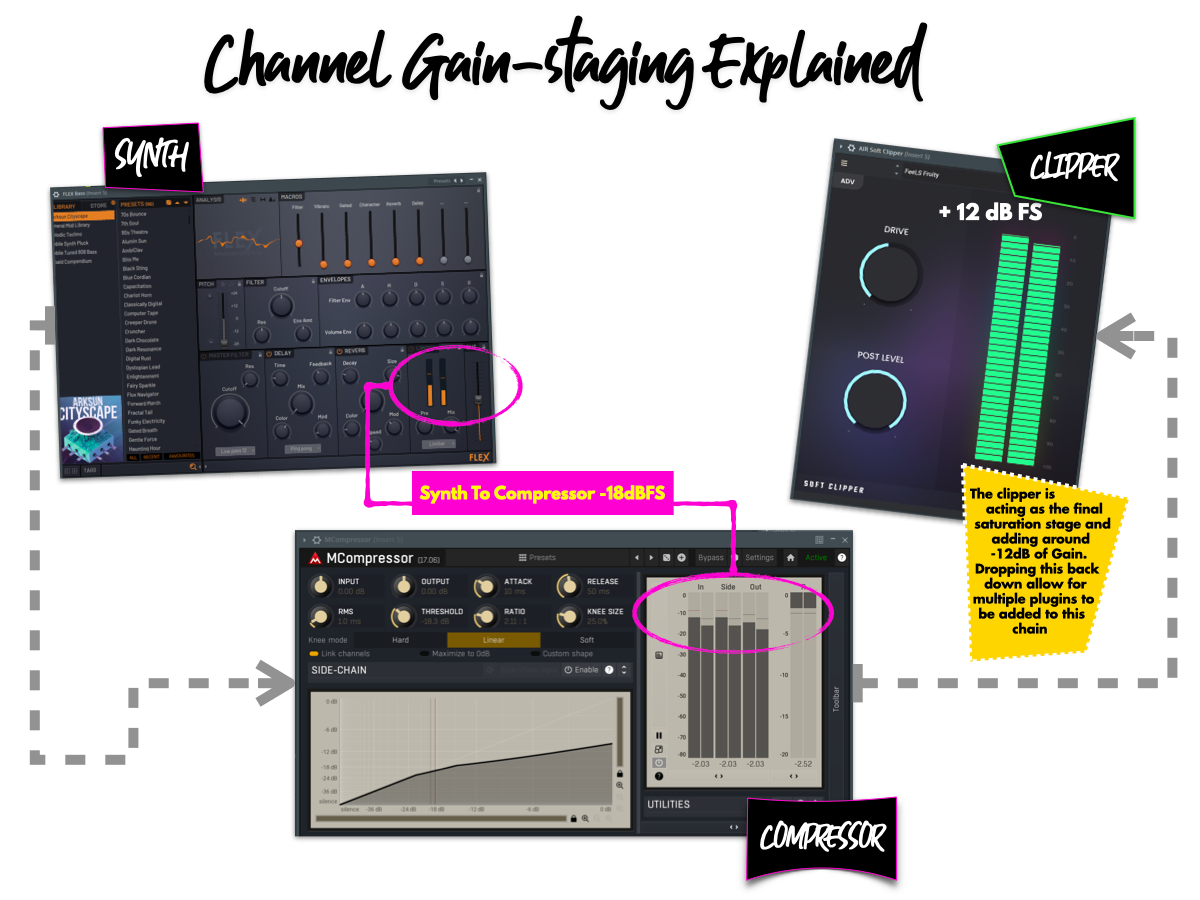
fix the levels going into the first plugin on the chain.
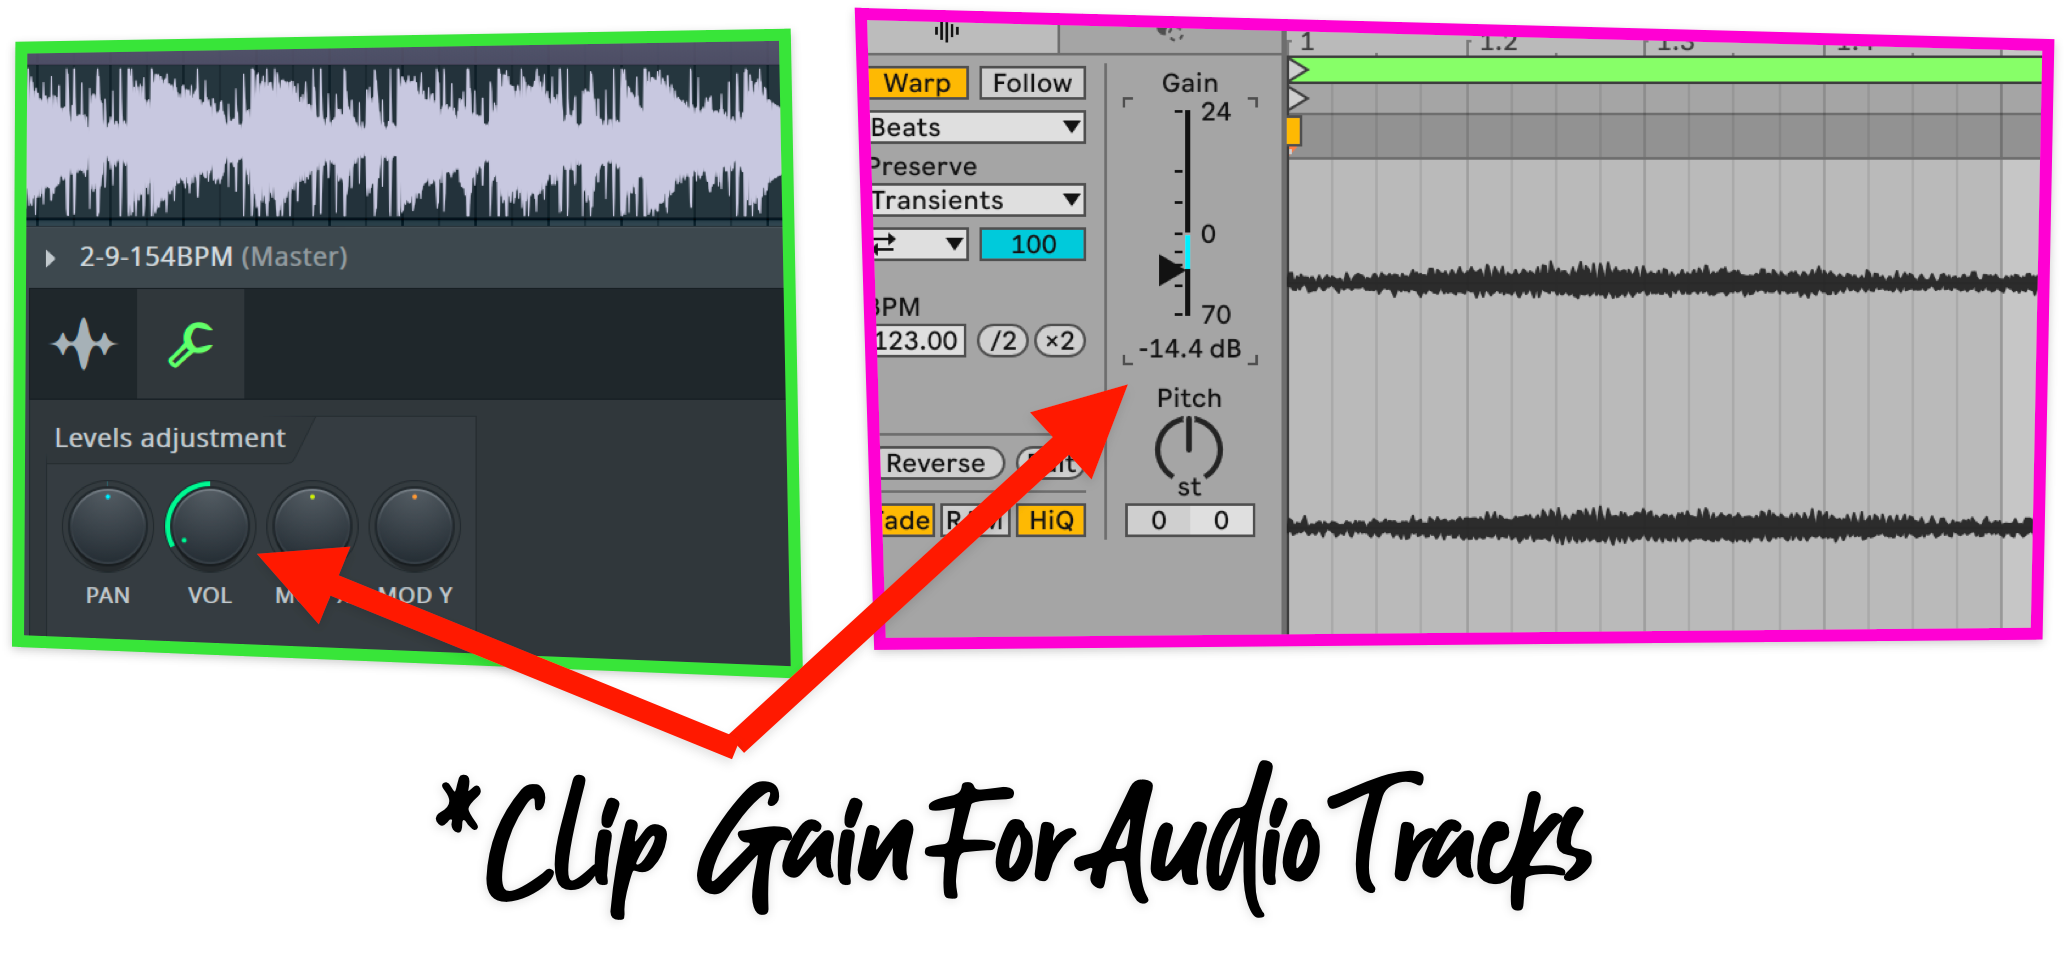
fix the level coming out of the synth or the clip gain of your audio.
Myth: “Gain Staging Just Means Don’t Clip”
Most hardware first producers learn gainstaging as just not hitting the red. that kindof translates to digital audio as well, however its a little more complicated than just not hitting the red.
You can have an entire record that sits under 0dBFS on every track meter and still not be properly gaistaged at the plugin level. If its too quiet or too hot going itno a compressor, the tool is not operating at optimal function.
Gainstaging means adjusting your levels so that you know what each plugin is doing. This is its core function. its easy to trick your ears with gain adjustments thinking your plugin chain is making a huge difference.
From there making sure each plugin is getting the correct level ensures the plugin can do its job correctly and agian, not trick your ears with simple gain adjustments.
MIX HUB
If you want a second set of ears on how your levels are actually sitting, drop your mix into the [Mix Feedback Hub] — I’ll go through it and call out exactly where the gain staging is helping or hurting the track.
(Im also been working on a dedicated mixing toolkit for hardware-first producers is also in development — more on that once it’s actually ready to be useful, not just another download.)
A Gain-Staging Workflow You Can Actually Use
Rather than trying to start out with the correct levles, here what I actually do. I’ll start with the drums. I’ll drop the entire sequence of druums down to a peak of max -6dB but more often -12dB. From there I’ll analyze if any other staging is needed. sometimes the drums are just too loud, we all make tha tmistake. After this its all about fitting the instruments n the track, if more saturation/compression is needed on an element, gainstaging -18dB before hitting the saturation plugin is critical. Other areas not so much
key takeaways
GAIN STAGING ISNT A PRE MIXING 'CHORE' - ITS THE DECISION THAT DECIDES ALL OTHER MIXING DECISIONS.
CONSISTENT REFERENCE LEVELS MATTER - -18dBFS RMS/ 0 VU MATTERS FROM THE BEGINNING OF THE SIGNAL CHAIN
GET IT RIGHGT AT THE INPUT LEVEL ON HARDWARE - ITS NOT LIKE YOUR DAW, WHAT YOU RECORD IS WHAT YOU'RE STUCK WITH. THERE IS NO 'FIX IT LATER' FOR A BAD RECORDING.
FAQ
What’s a good gain-staging reference level to start with?
A common starting point is around -18 dBFS RMS on individual tracks, treated as a rough “0 VU” equivalent — close to what a lot of analog-modeled plugins assume. It’s a starting point to calibrate around, not a hard rule for every genre or plugin.
Does gain staging matter if I’m working entirely in the box?
Yes — arguably just as much. Digital plugins don’t clip the way analog gear does, but plenty of them (anything modeling saturation, tape, or a console) are voiced to expect a certain input level and will sound wrong — too clean or too aggressive — if you’re feeding them something far from that.
Is gain staging different on an MPC or Force compared to a DAW?
The principle is identical; the stakes are higher. Standalone hardware doesn’t give you the same “adjust and re-render endlessly” flexibility a DAW session does, so getting levels right at the recording/resampling stage matters more.
Can bad gain staging cause noise problems, not just clipping?
Yes. A signal that’s too quiet going in has to be pushed back up later, which raises the noise floor along with it. Gain staging is as much about avoiding “too quiet” as it is about avoiding “too loud.”
Should I gain-stage before or after EQ?
Gain-stage first as a baseline, then re-check after any processing that significantly changes level — a big EQ boost, heavy compression. Treat it as a level you return to at each new stage of the chain, not a one-time step at the very start.
Does gain staging affect the loudness of my final master?
Not directly — loudness is handled by limiting/maximizing at the end of the chain. But a well-gain-staged mix gives the mastering stage a cleaner, more consistent signal to work with, which usually means better results at whatever loudness target you’re aiming for.
How do I fix gain staging on a mix I’ve already finished?
Go stage by stage — input/track level, then buses, then master — and check whether any single element is dramatically hotter or quieter than the others relative to how hard it’s being processed. It’s usually faster to fix than people expect, even on a mix that’s mostly done.
Is there one “correct” gain-staging number for every genre?
No — genre, arrangement density, and how loud you want the final mix to feel all shift things around. What doesn’t change is the underlying principle: consistent, intentional levels feeding each stage of your chain, on purpose, rather than by accident.
RELATED - [OTHER RELATED POSTS]


Where does gain staging actually live in your workflow right now
something deliberate, or something you’ve genuinely never thought about until this post? Tell me in the comments, I read every one.