


🧪 Lab Report #6: Parallel Compression for Real People — Get Bigger, Louder Mixes Without Killing Dynamics
Most compression tutorials focus on control. Parallel compression is about energy — blending an uncompressed signal (for punch and transients) with a heavily compressed copy (for body and density).
Instead of taming the loud parts, you lift the quiet ones. Done right, it sounds big, exciting, and expensive — without crushing the groove.


TLDR: Parallel compression blends a heavily compressed copy of a signal (10–20 dB gain reduction) underneath the original, uncompressed track. Instead of squashing transients, it fills in the quiet sustain beneath them — adding density and perceived loudness while the original punch stays intact. Typical blend: 15–40% wet.
Step 1 — Understand the Goal
Parallel compression is about perceived loudness.
You’re not just turning things up — you’re filling in the quieter transients with compressed sustain.
Think of it as painting shadows underneath the highlights of your mix.
Use it when:
Drums feel thin or uneven
Vocals lack body
The mix sounds too polite but you don’t want to lose punch
Step 2 — Build the Setup
There are two main approaches:
1. Send/Return Method (Classic “New York” Style):
Create an aux track called “Parallel Comp.”
Send your drums, vocals, or full mix to it.
Insert a compressor and squash it hard (10–20 dB gain reduction).
Blend that return under the dry signal.

2. Built-in Parallel Mix Controls:
Modern plugins like FabFilter Pro-C 2, UAD 1176, or Air Compressor (MPC) have a Mix % knob — making this process simple without extra routing.
Step 3 — Choose the Right Compressor for the Job
Different compressors create different feels:
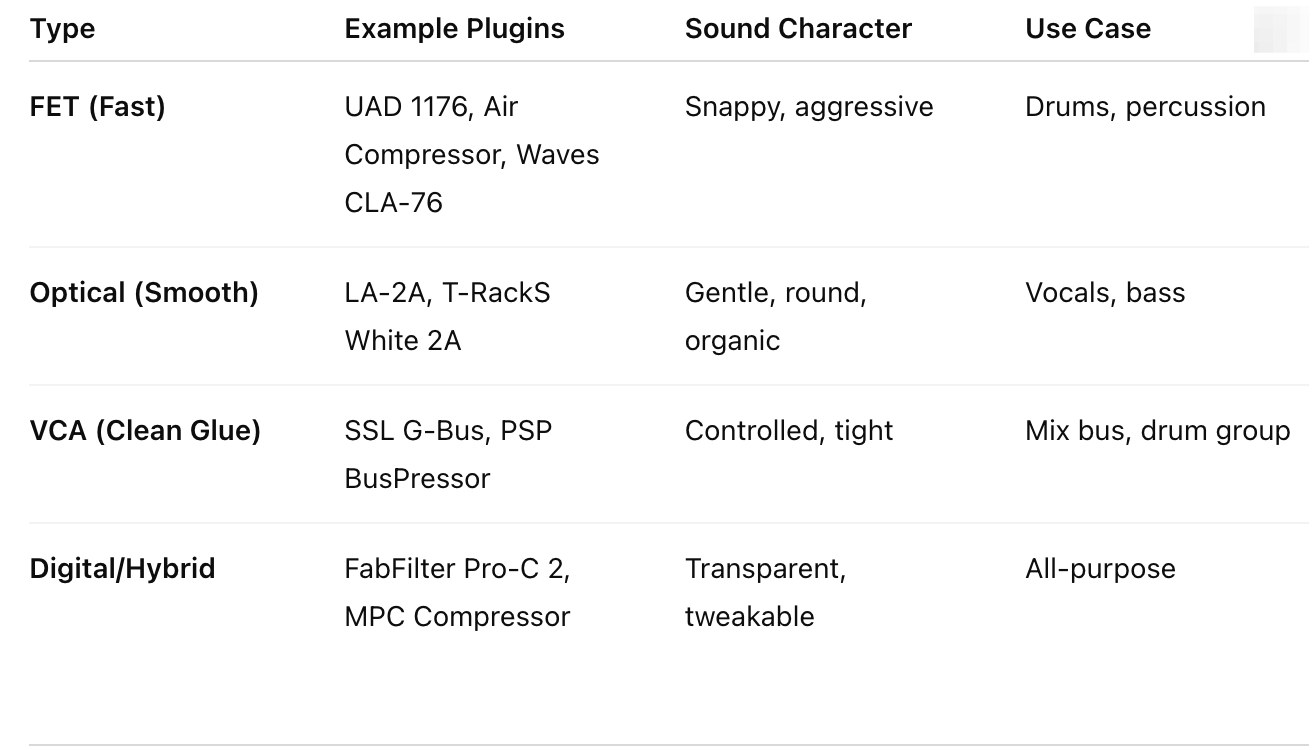
FET (Fast)UAD 1176, Air Compressor, Waves CLA-76Snappy, aggressive Best for Drums, percussion
Optical (Smooth)LA-2A, T-RackS White 2AGentle, round, organic, Best for Vocals, bass
VCA (Clean Glue)SSL G-Bus, PSP BusPressorControlled, tight
Best for Mix bus, drum group
Digital/HybridFabFilter Pro-C 2, MPC Compressor Transparent, tweakable Best All-purpose
Step 4 — Dial In the Settings (Start Here)
A real-world starting point:
Ratio: 8:1 to 20:1 (yes, slam it)
Attack: Medium-slow (10–30 ms) to let transients breathe
Release: Fast (50–150 ms) so the signal “pumps” musically
Threshold: Lower until you see ~10–20 dB reduction
Blend (Mix): 15–40 % wet depending on material
Then level-match the overall output so you’re not fooled by loudness.

Step 5 — Apply It Where It Counts
Drums:
Blend crushed compression (1176 style) underneath to make kicks and snares feel solid. Try bussing all drums together — not each individually.
Vocals:
Send to a separate compressor (LA-2A style). Drive it hard, then pull it under until you feel the words “stick” in the mix.
Bass or Synths:
Use a fast attack to grab peaks and a quick release to keep movement. Great for bringing out tone without adding distortion.
Full Mix Bus:
Very subtle. Low ratio (2:1 – 4:1), 1–2 dB reduction, then blend lightly (10–15 %). This is the “glue.”
Step 6 — Parallel vs Serial Compression
Serial compression = each compressor does a small amount in sequence.
Parallel compression = one does a lot on a duplicate, then gets blended.
You can use both — e.g., gentle vocal compression first, then a parallel smash underneath for tone.
Step 7 — Plugins That Shine in Parallel
AIR Compressor (MPC)
Clean, flexible, and with built-in Mix % — perfect for fast workflow.
UAD 1176 Classic Limiter
Industry gold for drum smack. Use “All Buttons In” for aggressive parallel blends.
Waves CLA-76 / Blue Stripe
Adds vintage color; great for midrange presence.
FabFilter Pro-C 2
Transparent control, built-in dry/wet, and lookahead for precise transient shaping.
Softube CL 1B / Tube-Tech
Smooth optical character — great for vocals and acoustic instruments.
MPC Native ‘Master’ or ‘Bus’ Compressor
Excellent for bus work; behaves similarly to SSL-style compression.
Step 8 — Common Mistakes
Over-blending until you lose dynamics.
Forgetting to level-match the result.
Compressing everything — pick one or two elements that benefit.
Using the same compressor on both paths (defeats tonal layering).
Step 9 — Workflow Example
Create Aux: Send drum bus → “Parallel Comp.”
Compressor: 1176 clone (Attack slow 5, Release fast 7).
Drive: 20 dB gain reduction.
Blend: Return -12 dB below dry drums.
Check: Bypass to compare — it should feel fuller, not just louder.
The Part Nobody Tells You
Most tutorials stop at “blend a squashed copy underneath.” What they skip: the biggest improvement usually isn’t the compressor — it’s the level-match step right after. Ears reliably rate louder as “better” even when nothing else changed. If you’re not A/B’ing at matched loudness, you’re not actually evaluating the parallel blend — you’re just evaluating volume.
Myth Bust: “More Parallel Comp = More Loud”
Cranking the blend past 40–50% doesn’t make a mix bigger — it starts to cancel out the exact dynamics parallel compression is supposed to preserve. Past that point you’re not adding density anymore, you’re just recompressing the whole signal and losing the contrast between the dry punch and the compressed body. If it starts sounding flat again, you’ve overshot — pull the blend back, not the ratio.
Mix Feedback
Want to see if your parallel compression is helping or hurting your mix?

Key Takeaways
Parallel compression blends an uncompressed signal with a hard-compressed copy (10–20 dB reduction) to add density without killing transients.
Start at 15–40% blend, level-match after, and use a fast FET compressor for drums, optical for vocals.
Past ~50% blend you’re not adding size anymore — you’re just recompressing the whole signal and losing the contrast that made it work.
FAQ
Does parallel compression work on vocals?
Yes — send to a separate optical-style compressor (LA-2A style), drive it hard, and blend it under the dry vocal until the words feel like they “stick” without losing the natural dynamics of the performance.
What ratio should I use for parallel compression?
8:1 to 20:1 on the compressed (wet) path. The high ratio is fine because you’re blending it under the dry signal, not listening to it alone.
Is parallel compression the same as New York compression?
Yes, “New York compression” is the classic name for the send/return parallel compression technique, originally used on drum busses in NYC studios.
Can I do parallel compression on the MPC/MPCXL?
Yes — the AIR Compressor plugin has a built-in Mix % control, so you can dial in parallel blending without building a separate aux/send routing.
What’s the difference between parallel and serial compression?
Serial compression applies smaller amounts across a signal in sequence. Parallel compression applies a large amount to a duplicate signal, then blends that under the original.
How much blend is too much on parallel compression?
Past roughly 40–50% wet, you start losing the dynamic contrast the technique is meant to preserve — the mix flattens back out instead of feeling bigger.
Should I use parallel compression on the full mix bus?
Very sparingly — a low ratio (2:1–4:1), 1–2 dB of reduction, and a light 10–15% blend. This is glue, not the main event.
Looking to test your parallel compression chain?
Try it on my curated Drum & Tone Sample Packs — made specifically for compression and saturation testing.
👉 Download Sample Packs
Related Posts + Next Steps


Final Thought:
Parallel compression should never sound like compression — it should feel like confidence. When you get the balance right, your mix doesn’t just sound louder — it feels alive.