

Mix Bus Processing: From Amateur to Pro in One Clean Chain
Most beatmakers either skip the mix bus entirely or over process it. Here's the correct approach and the exact chain that works.

Mix Bus Processing From Amateur to PRo in One Clean Chain
The moment I realized my 2-buss chain wasn't working for me was when I realized that I had zero headroom for mastering to do anything. There is a difference between mixing a track and finalizing or mastering a track/project.
What’s up, lab tech,
If you’ve ever wondered why your mix sounds ‘almost there’ but never quite ‘pro’ the 2buss is usually where the gap resides.
We’ve seen the rise of AI driven or ‘algorithm’ driven mastering services over the years and i’ve even fallen victim to trying to use them. Trying to use the ‘robot’ mixer, if you will, left most of my tracks sounding wonky AF. It really had me wondering what the heck I was doing so freaking wrong.
I found a very useful tool from roexaudio called /mixcheckstudio.roexaudio.com/
that analyzes the mix based on genre and gives pretty clever feedback. I’d have to say most of that feedback helped reaffirm what I was experiencing when translating mixes.

Sometimes less is more, and more often than not, balancing your levels will get most of the work done. The most that needs to be happening on the stereo output is a little EQ and compression, perhaps a little tube drive to act as glue, but that’s really it.
A professional mix bus chain processes the full mix in this order: subtle compression for glue, broad EQ for tone, light saturation for harmonic density, and, lastly, a limiter for headroom control.
Pro Tip: Signal flow is key; if you skip the order or stack too much at one stage, it makes your mix sound amateurish and congested rather than polished and clean.
Why Processing On The Mix Bus Isn’t Optional
That’s what you’re sending to mastering?
I don't know when this habit started, because it’s not how I first learned. But I used to start surgical EQ and compression after I got a good overall balance and then would add bus processing.
Wrong approach
As soon as I would slap the compressor or EQ on, things would get ‘interesting'; some things would be popping in and out of phase, with volume pumping, etc. It's best to mix into your compressor before you start any EQ or per-track compression.
But why even have any processing on the mix bus in the first place? Why not just send a well-balanced mix to mastering, or just crank the volume up loud enough and upload to a distributor?
Mix bus processing is more than just arbitrary effects; each insert should be doing something. Whether it's an EQ or a compressor, there is an inherent function that will improve your mix and shape your unique sonic signature.
Audio Examples:
Zero Processing
EQ/Compression only
Compression helps to glue the mix together while EQ sets the tone. Think of it like being a party planner, and you’ve got to bring a bunch of different crowds together. On your mix bus, or submix level, you’re gelling certain frequencies together and massaging them either up or down to increase the energy, vibe, punch, earth, or whatever mood you can come up with. Same thing you’d do at a party.
Bus processing is the final sonic tool for crafting a great mix, and just like party planning, if you start off thinking about and setting the bar for how your audience is going to feel, it helps to make better decisions as you’re adding/taking things away during the mix (and even the creative process)
The Correct Order: Compression → EQ → Saturation → Limiting
Signal flow is everything.
In audio, everything we’re doing is technical physics, and physics is math.
And just like math, order of operations matters. When you change the order of the operations, the outcome can be drastically different.

Compression first-
Then EQ
Some Saturation
and Limiter
What Each Stage Is Actually Doing
Ok, so let's go with the ‘flow’ and start with your compressor; this is to catch any peaks and provide the essential ‘glue’ that will define your mix. Again, using the party planner analogy, you’re bringing all the frequencies together to create a cohesive mix. This is where you’ll bring punch, a little grit, snap, or a groove.
This is also when you can tell what’s not going to make the cut, or what needs toning down, or edge.
Next is your EQ; it will set the tone of the mix. Is it bright and energetic, or dark and moody? Yes, of course, the arrangement and instruments chosen determine this; however, adding a bunch of high-end to a dark trap song could throw the entire vibe off (not to mention not leaving enough room for the artist)
Saturation is your friend, in small amounts. I’m a huge fan of using saturation as a secondary (tertiary) form of compression or congealing of frequencies.
Saturation helps roll off some high-end and provides a subtle gluing of frequencies that makes the hairs in your ears stand up.
Be cautious with this; remember less is more, so if you’re doing something edgy, it’s best to have some saturation on the 2buss but only enough to accomplish the goal. Start with highly noticeable distortion and lower the distortion until ‘audibly pleasant’
The last stage is what will ultimately save your mix from squashing. Your compressor may catch some spikes; however, the limiter is a brick wall that any strays will run directly into.
Clipping is also a form of limiting and could be applied either in front of the compressor or at the end of the chain.
The Mistake Almost Everyone Makes First
One of the number one mistakes people make is trying to use mix bus effects to fix a bad mix.
IF your mix sucks, your mix sucks. Bad performances, wrong instrument choices, and an overall lack of clarity in a mix are not on the 2-bus to fix.
Almost everyone who complains about their mix being bad is due to the mix itself being bad, and /or trying to fix it by overprocessing with compression, clipping, or limiting
Settings That Won’t Wreck Your Dynamics
Contrary to popular belief, having a fast attack on the 2-bus won’t completely ruin your dynamics.
Over the years, the “SSL Trick” has been something that can easily get more recognizable results from the 2-bus compressor; however, I’ve found that fast attack and low ratio can also yield some pretty good results.
Especially when paired with using submixes, I’ll drop a link below so you can check that out.

Your 2bus should be peaking at around -6dB, if you get a few randoms that peak at -4 its ’s not going to ruin the mix.
Attack to something fast like 5ms, and your release to something like 60ms.
This keeps the compressor ‘snappy’ and reacting fast to transients,
For 2 Bus compression, I'm a huge fan of a 1:3 to 2:1 ratio; that’s it.
I’ll typically set the threshold to around -10dB if my input is -6dB and work my way up from 1:1 until I hear what I like.
If you need something a little more aggressive, that is what the submixes are for. You can drive a little more aggressively there to make sure the signal is believably delivered yet controlled when it hits the 2bus.
For EQ, roll off a little low end (~20- 30 Hz), and the rest is subjective.
When it comes to the mix bus, it doesn't take much; try saturation at 5%.
Just make sure to gainstage in betwen plusins, The optimal level for your limiter is around -6dB however if you’re using a Maximizer plugin (which technically is a mastering plugin) then that input level may be around -12dB.
Recap
Stage 1 - Compression [Glue]
| -6dB optimal input level| threshhold to catch peaks| 1:3 to 2:1 ratio| 5ms to 15ms attack| 40-100ms release
Stage 2 - EQ [Tonal Balance]
| cut unnecessary low freq under 40Hz | shape sound to tase
Stage 3 - Saturation [harmonic density]
| great place for analog emulations or ‘sound goodizers’| don’t overdo it
Stage 4 - Limiting [headroom control]
| Catch any stray peaks, set brickwall volume maximum for mastering.
Pro Tip:
The part that nobody tells you is that more processing on the mix bus is never the fix. if your mix sounds mudd after adding ompression and EQ then it probably isnt the mx bus, its som’s something upstream you’re trying to fix downstream.
MYTH: “More Glue Compression = a Punchier Mix”
\ Glue compression does what it's supposed to do: ‘glue’ the mix together; however, overcompression on the mix bus actually flattens transients. Your mix won't be punchier; it will be flatter. |

The Practical Workflow
So my workflow for client work varies a little from my personal stuff.
Anytime someone sends me something, I always load it up and listen to how they creatively heard it. I’ll make notes of what stands out to me, emotionally, vibe-wise, etc. It all depends on the track and where the artist was trying to go.
Next, I’ll listen to the reference tracks and decide which elements I’d like to incorporate, and start thinking creatively about the ‘drama’ of the song, including automation, reverbs, etc.
Then we’ll start analyzing their 2bus; ideally, if there is nothing, that's great, but if they like the sound of a particular plugin, I’ll work with that.
For myself, it's pretty straightforward: I'm either doing exactly what's above, OR I'm leveling the main aspects of the song, like the rhythm section, bass, and main melody. I’ll fix my 2bus to where I want it and start producing or adding elements from there.
One workflow starts with everything already created and ready to go; the other starts with a few critical aspects, with the rest added and evaluated for their interactions with the 2-bus compressor.
Order Matters More Than Plugin Choice — Compression, Then EQ, Then Saturation, Then Limiting.
Each Stage Should Do Less Than You Think; The Mix Bus Glues, It Doesn’t Fix.
If Something Sounds Wrong On The Bus, Check The Source Tracks Before Adding More Processing.


The Fundamental Questions
Q: What is a Mix Bus (or Master Fader), and why is it so important?
A: The Mix Bus is the singular point where all the signals from your individual channels (drums, bass, vocals, guitars, synths) are combined into a final stereo signal. It’s important because everything you apply here affects everything in the mix. Think of it as glue; it can blend disparate elements together, add color, and set the dynamic range for the final master.
Q: How much ‘mix bus processing’ should I do?
A: The golden rule is: Subtlety. While individual tracks might require aggressive 6dB cuts or boosts, a mix bus EQ or compressor typically uses tiny movements. 1dB of gain reduction is a lot on a mix bus. You are massaging, not reshaping. A lighter touch is always safer, especially if your track is going to a mastering engineer later.
Q: In what order should I use plugins on my mix bus?
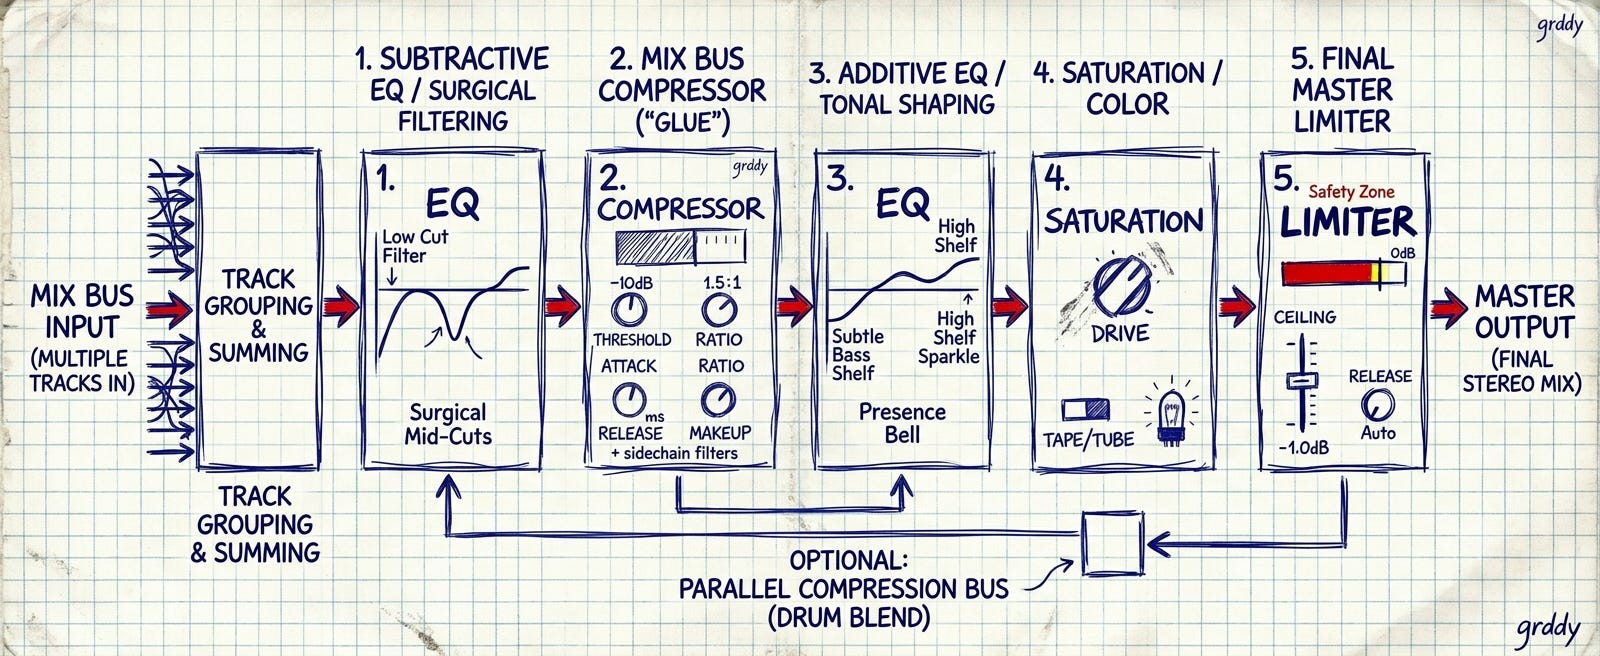
A: The diagram above shows a standard and safe processing order. The flow generally goes: Subtractive processing (like surgical EQ), dynamic control (compression), color/saturation, and final peak control (limiting).
Compressor: (Box 2 in our diagram) Usually the first active element. It tames peaks, adds “glue,” and establishes the groove.
EQ: (Box 3) For global tonal balancing. Gentle high-shelf boosts or low-end management.
Saturation: (Box 4) Used optionally to add harmonic complexity, warmth, and subtle ‘analog’ glue.
Limiter: (Box 5) Always the final stage for peak protection. It ensures nothing goes over 0.0dB.
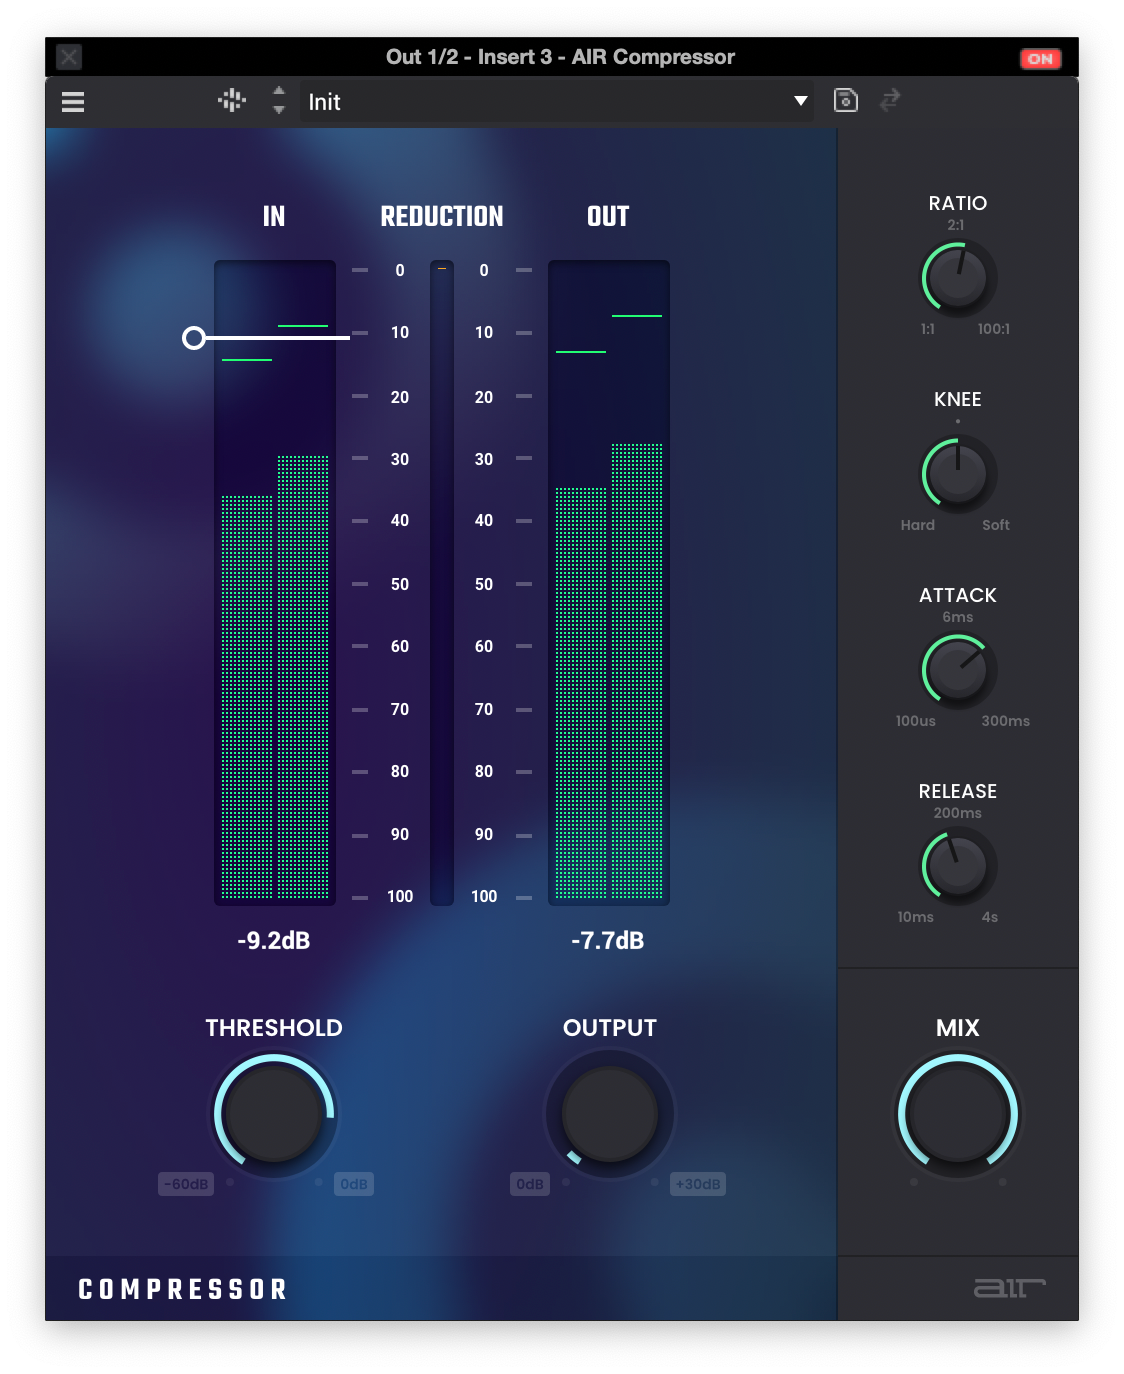
Q: How do I set up a mix bus compressor effectively (Box 1)?
A: This is the big one. As shown in the diagram, start with gentle settings:
Threshold: Set it so you are seeing just 1- 2 dB of total gain reduction (seen in the bar graph meter). It should only just kiss the signal.
Ratio: Keep it low. 1.1 or 2:1 are standard for the mix bus.
Attack: Slow. 10ms-30ms or even slower. This lets the initial ‘crack’ of the snare or kick through before the compressor clamps down, preserving impact.
Release: This depends heavily on tempo. You want the compressor to release in time with the song's beat. A common starting point is between 100ms and 300ms, or ‘Auto’ for ease.
Q: What is the purpose of the Mix Bus Limiter (Box 4)?
A: The Limiter is your safety net. On your final Master Fader, it must be the very last element in the chain. As seen in the diagram, the Ceiling is usually set to -1.0 dB. The limiter prevents transient peaks from exceeding this level (digital clipping) by instantly compressing any audio that tries to exceed it. It ensures maximum possible loudness within safety limits.
Q: When should I add these plugins to my chain?
A: There are two distinct schools of thought:
Mixing ‘Into’ the Bus: Add your compression and subtle EQ very early in the mixing process. This lets you react to how your mix interacts with the bus processing as you build the track. Many engineers prefer this as it informs their dynamic decisions.
Post-Processing: Build your entire mix without any bus processing, and apply it only once the individual tracks are perfectly balanced. This ensures a more pristine source.
There is no wrong answer, but most professionals find that mixing into a gentle compressor (set up early) yields faster, more cohesive results.


What does your current mix bus Chain look like? Comment below; I read every one of them