

Reverb That Adds Depth, Not Mud: How to Use Reverb the Right Way in Any Mix
How to use reverb to create space in your mix without washing everything out.

What’s up, lab crew?
So imagine this scenario:
You’ve spent the past three hours (more like three days) locked in on a mix. Drums are punchy and locked in; the bass is singing right; vocals are forward and in your face. Then you add the reverb, and suddenly the whole mix sounds like it was recorded in a bathroom and washed out with granular delay.
ok maybe not that dramatic, but does that sound vaguely familiar?
Reverb is one of those sneaky tools that seem simple until you start to apply it yourself (especially the DAW stock Reverb), and it’s obvious that the reverb is the problem, right? lol
The frustrating part is that a bad reverb won't announce itself in a mix; it's a sneaky little devil, blurring the lines and softening transients randomly throughout the mix. Apply the wrong reverb, and your bright, high-punchy mix suddenly sounds wet and washed.
And no, unfortunately, it’s NOT the reverb’s problem, yet it’s how you’re using it.
When you’re using reverb right, you necessarily hear it; you feel it. There’s a space, there’s dimension, things breathe, and elements that needed to sit back a bit actually sit back. Vocals sit slightly above the track without competing or sounding superimposed, and the whole track sounds and feels as if it were recorded in a physical space rather than assembled on a grid. So, with that being said, let's dive in.
How to use reverb on the MPCXL to create space in your mix without washing everything out
Reverb muddies a mix when decay is too long, there's no pre-delay separating the dry signal, and too many elements share the same reverb space. Fix it by using a short pre-delay (10–30ms), keeping decay under 1.5 seconds for most elements, running reverb on a send/return channel, and cutting low frequencies from the reverb return.
So What is Reverb Actually Doing?
All right, so in the plainest way possible, what is reverb actually doing? Reverb simulates the natural acoustic reflections of a space by creating a dense cloud of tiny, overlapping echoes that blend. Think of reverb as the sound you hear when you yell inside a big hall or auditorium. Instead of hearing distinct repeats, your voice fills the room, creating a smooth wash of sound that makes everything feel bigger and more alive.
A simple way to remember the difference: Echo is like shouting into a canyon and hearing your voice bounce back to you once or twice - 'Hey... hey.' Reverb is like standing in a gym and clapping your hands. Instead of a clear repeat, you get a lingering, blended tail that quickly fades out. Echo equals distinct repeats; reverb equals a smooth, blended ambiance from lots of tiny reflections all close together. This is why reverb helps place sounds in a space, while echo makes sounds stand out on their own.
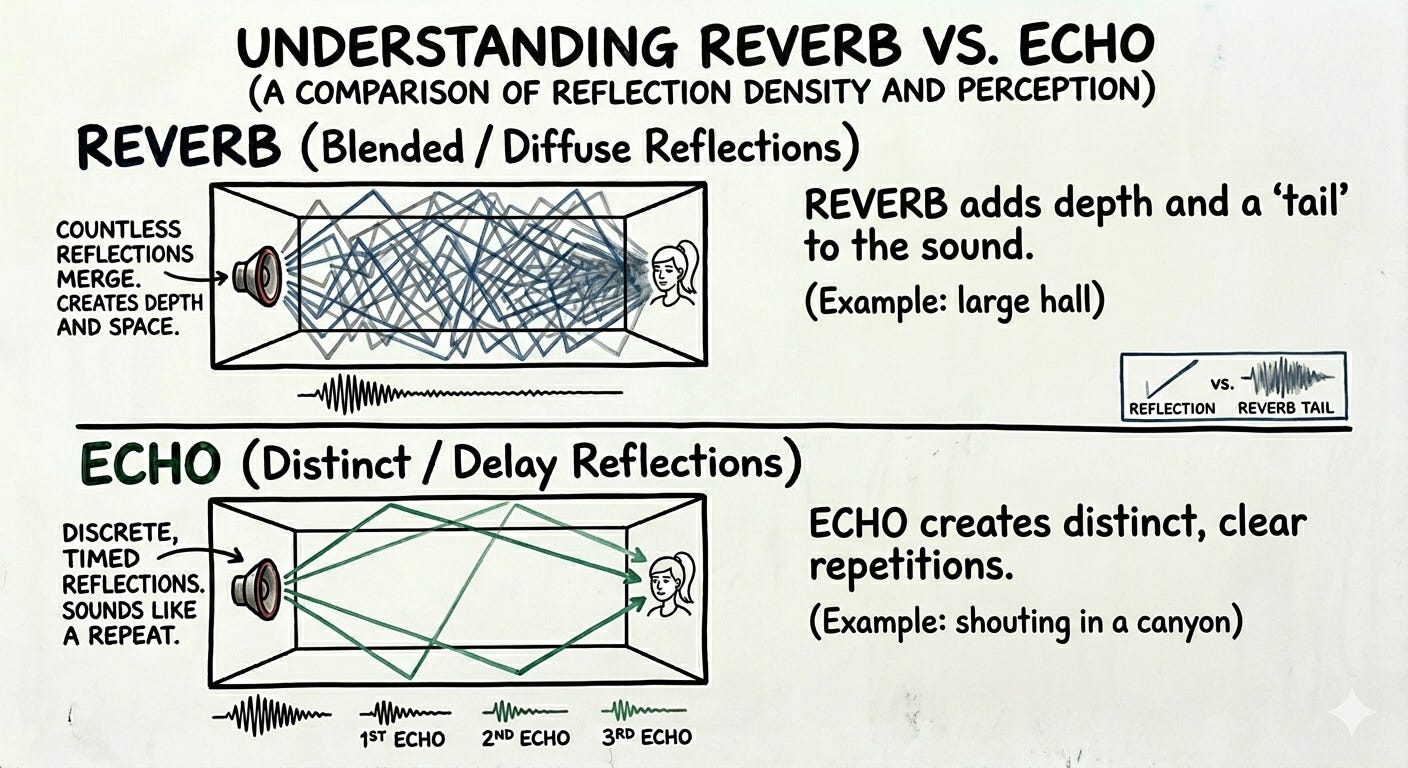
So a reverb is drastically different from an echo, right? So a lot of times, it’s easy to kind of think of creating space, and immediately going to either an echo or a reverb, but they are two different ways of creating space that are very effective in creating depth in a mix. And so, essentially, what happens with reverb, and the reason why it’s used, is that in early recordings, you know, a lot of these recordings were done inside of a specific space. They had a distinct sonic quality, and the instruments blended very well, creating a realistic-sounding mix.
So, without that reverb, essentially, you have a bunch of microphones plugged into a direct input source, and the sound can sound incredibly flat and lifeless. So reverb helps create dimension and depth, and balances the ratio of direct sound from the microphone to the room's reflected sound. And so this enables you to place elements in the foreground or background, creating cohesion in the mix. And actually, it can create an emotion as well.
So, in my experience, reverb has been one of those incredibly powerful, subtle tools that’s at the top of the professional mixing deck, that when you absolutely understand how to use reverb, your mixes will sound even more professional, because you’ve got a good balance of emotion and vibe and polish. You’re enhancing how the elements interact within the mix, which, in turn, creates different experiences in the listeners’ ears.
So what Is Making Your Reverb Sound Muddy?
So why does reverb get muddy? The real causes? So... If you’ve ever slapped a reverb on something and noticed that the entire mix immediately becomes muddy or sounds like a wash, more than likely your reverb is receiving excessive low-end content.
A lot of the time, the algorithms in a reverb will amplify the low end in the 200-600 hertz range. And if this isn’t filtered out, this is gonna create a muddy, boomy, messy buildup. And especially so if you’re a cave, if the decay time is too long. So these 2 things combined result in low frequencies stretched out across the entire mix.
So while your base is hitting, while your kick is hitting, while the bass drum is hitting, you’re also getting those combined frequencies of any low frequencies coming from a pad, combining with that. Sometimes they’ll cancel out, and sometimes they’ll double themselves, and you get this muddy mix of frequency. And another thing is the too much reverb level. A very common beginner mistake is making the reverb so wet that it's hard to hear. Especially if you’re used to reverb that comes with presets in many sense and rumplers, a lot of those reverbs are meant to enhance the sound design.
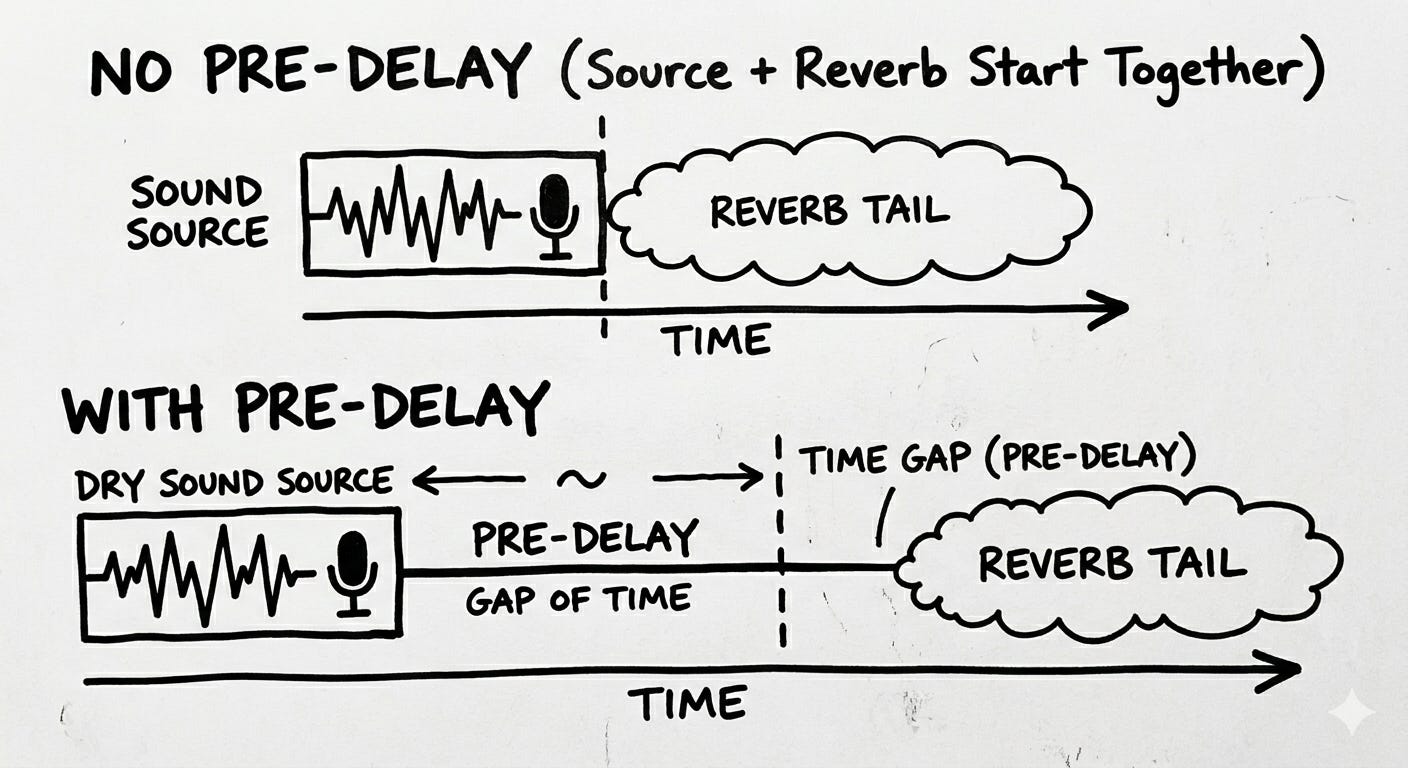
Whereas in a mix, you’re using reverb to add cohesion in a similar way that you would use a compressor in a very mild way. Reverb is about feeling. So excessive reverb levels, or reverb applied to too many tracks, are gonna fill up all the available sonic space, creating a dense, washed-out mix. And then one of the more common mistakes among beginners, ain’t even professionals alike, is having 0 pre-delay.
This causes the reverb to start essentially at the same time as the dry source signal. It hides the initial transient of the instrument, and it’s gonna make it sound wet and indistinct from the background. And so, a little bit of pre-delay allows you to hear the instrument and separate that from the reverb tail. And so, too many elements in the mix, too many frequencies in decay times, essentially just pulling, and this happens more frequently than not when you pull a preset out or you add reverb on every channel.
Right? So, especially if you’re working on standalone devices like the MPC, XL, or anything like that, it’s very easy to slap a reverb on something and keep moving because you’re in the production process. However, these things can be mitigated with very simple techniques that professional engineers use.
If you hear a muddy or washed-out reverb in your mix, here’s a quick troubleshooting checklist you can run through right away:
Step-by-Step Checklist for Muddy Reverb:
Check your reverb send levels. Is it too high on any track?
Make sure you’re using a reverb return/aux channel, not putting reverb directly on every track.
Apply a low-cut or high-pass filter to the reverb return, starting around 200-300Hz. Too much low end in reverb is a legendary mud creator.
Try shortening the decay/release time. If it’s set long (over 2 seconds), pull it back and see if clarity improves.
Add or increase pre-delay (try 10-30ms), so the reverb tail doesn’t mask the attack of your source.
See how many tracks are being sent to the same reverb. Too many elements sharing a single reverb (especially pads, keys, vocals) can add up; try separating them or using different reverbs for front/back or for different instrument groups.
Don’t send heavy low-frequency sources like kicks or bass to the reverb unless for special effect. Remove these from the reverb send.
Follow Me On Spotify!!!
My goal is to release an instrumental album! I’ll definitely let you know the date; in the meantime, follow me on Spotify! Help me get to my first 10 supporters!
For example, if I hear a muddy reverb, my first instinct is to say, "There is too much low-frequency content coming into this reverb.” Chances are, we need to cut it. However, that may not be the case. What actually might be the case is that there are too many elements going into the same reverb. And, of course, reverb should never go on a kick drum or a bass instrument, unless specifically for sound design.
And a lot of times, we’ll try to add all of the elements into the reverb, thinking that’s creating a cohesive mix. However, the kick drum is competing with the bass frequencies, which may also be competing with the low frequencies in your piano, causing the mix. So, the 1st thing is definitely frequency, but the 2nd thing to consider is how many things are being fed into your reverb, and how loud they are?
How I Set Up Reverb on The MPCXL
So here’s how I typically set up reverb on my Force; the same applies to the MPCXL and, essentially, any other device/DAW.
The first thing you want to do is imagine your space.
Personally, I’m imagining standing at the center/front of the stadium stage.
I want the clap to reverberate, but I also want to hear a little slapback. Personally, I like the bounce it creates when it’s synced to the tempo, so that’s what we’ll go for.
Second, I’ll set d my return track for my reverb, and then route my clap to that track.
🔊 MIX NOTES: 3 Mistakes Beginners Make with Reverb (and How to Fix Them)

🔊 MIX NOTES: 3 Mistakes Beginners Make with Reverb (and How to Fix Them)
Video Example 👇🏾
I personally like automating my reverb send for a little variance.
SO what’s the Process?
*The first thing I reach for depends on what I’m trying to achieve; however, 90% of the time, I’m going to zero everything out and start from left to right.
Today I started at pre-delay, then moved to the decay time. Just in case you need a quick refresher: pre-delay is the short gap between the dry sound and the point where the reverb tail kicks in, which helps keep the original sound clear before the reverb fills in. Decay is basically how long the reverb tail lasts, controlling how long the space feels.
Ambiance usually adjusts the overall brightness or darkness and can make high frequencies shine or sit back. Early reflections are the first quick echoes you hear before the main reverb tail, giving a sense of the space's shape and size. I adjusted the ambiance to favor high frequencies, then went back to early reflections so I could better distinguish what was happening.
Though I picked a different early reflections type than I initially wanted, this one gave me the sound I was looking for. A stadium stage will have some early reflections, and the longer reverb tail will be audible and clearly separate.
The balance is what will dictate the overall focus; some reverbs have this setting, which saves on CPU and avoids the need to use multiple reverbs. Using this section helps focus on what I want to hear: the early reflections of the room and a hint of the eail.
USE MULTIPLE REVERBS!!!
Even though the balance knob gives a lot of control, I still create one or two other reverbs that mimic the exact space. I’ll create one to two other reverbs that emulate the front and/or back of the space.
This way, I can send individual elements to specific places in the mix.
For front space, turn the pre-delay down and balance to the ER.
For Back Space, keep pre-delay high and turn balance to tail.
Pre-Delay: The setting most producers ignore
In a nutshell, pre-delay is the small amount of delay between the sound source and the reverb tail.
I really discovered this while trying to emulate the technique that I just showed you. I was always impressed by Johnny Juliano and his ability to add dynamics and tension in his beats. He did so by using reverb rhythmically.
With pre-delay, I typically follow this reference from Mastering.com. They’ve got an amazing course on reverb that I highly recommend checking out.
But realistically, I'm setting the pre-delay as such.
For ambiance around 0-10ms
For a room between 5-25ms
For Chamber or strings between 5-40ms
and for a Hall reverb about 10-50ms
And all these will depend on what type of space you’re trying to emulate and ultimately what the mix needs.
For example, a vocal that I want to sit inside the mix might get a little more pre-delay, whereas a snare I want to push into the background a bit might get less.
Drums, Melodics, Vocals- Concrete Reverb Rules to Live By.
All right, so let’s say you’ve got your reverb set up and you’re trying to figure out what you want to send to where and if there’s a right way or a wrong way to send certain elements to your reverb. So here’s what I do. I avoid sending the base at all costs, no matter what. However, there might be instances for sound design where reverb on a base may sound good. At that point, I will print that.
That way, I have ultimate control over the audio and the sonics of everything else. I start with a 100% wet signal, send it fully to the reverb, and pretty much dial it back to my taste. Every element will have a characteristic that sounds good in the mix. It doesn’t mean that it needs a specific place. In the space that you create, ultimately, it just needs to have space in the mix. So how does reverb factor into that? Reverb is just what brings all of those elements together.
So if you want a washed-out sound, you’re going to add more reverb to the keys. If you want a washed-out guitar, you’re gonna do the same thing. Ultimately, the use of reverb is your creative decision. I can unequivocally say that every element in the mix is going to sound better once you add some level to it—especially vocals.
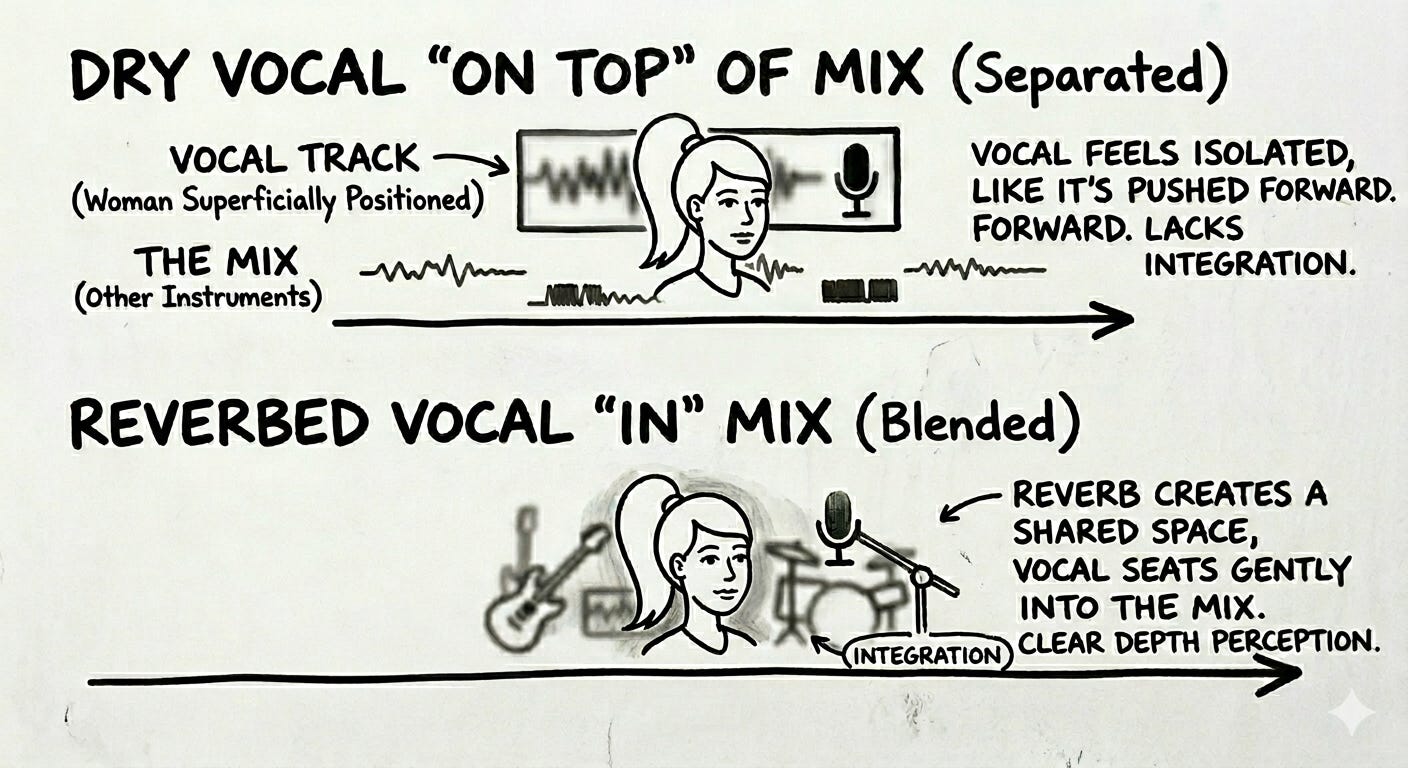
It’s the difference between the vocals sitting on top of the mix, almost like the person is standing on top of the CD cover, and a fully comprehensive mix, with the vocalist as critical to the song as any other instrument. One hand down, for me, is automating the reverb time or any reverb parameter during the mix.
For me, this creates unpleasant sonic artifacts that end up sounding weird. Artifacts can show up as little clicks, pops, abrupt changes in volume, or unnatural reverb tails—stuff that distracts from the mix and makes transitions sound artificial or glitchy instead of smooth. In certain instances, it may be a creative decision, but for the most part, I avoid automating reverbs or delays to prevent such artifacts. I will automate the sends instead, which means changing the volume going to the reverb. That doesn’t affect the effect's algorithm, so transitions stay clean and natural.
⚠️ Quick reality check: If you're turning reverb up because something sounds "dry," you might be solving the wrong problem. Dryness is usually a mix balance issue, not a reverb issue. Before you reach for reverb, ask: Is this element sitting right in the mix? Is it EQ'd? Is the volume right? Reverb is space; it doesn't fix balance.
“More Reverb = More Space” - Myth Bust
One of the biggest reverb myths in home production is that adding more reverb creates a bigger, wider mix. Here's why that's wrong — and what actually creates space.
I’m pretty sure you’ve loaded up your favorite VST, loaded up preset after preset until you had a ‘decent’ sounding beat, or at least one you were really jocking, then played it back on another system and heard nothing but mid and mud.
And here you are, thinking you’re doing something with the latest version of Serum and Nexus 5; however, all of those reverbs are clashing together and creating a muddy mess.
.
Or let’s say you’ve heard your favorite artist, and you think that reverb is the thing you’re missing the most. So, naturally, you crank up the maximum Vahlhalla reverb ON the track and call it a day.
Or even, let’s say you’ve got it all figured out and you know each element needs its own ‘sapce’ in the mix, so what do you do? Lowcut everything (so things don’t get muddy) and start flying those things out left and right. After all, panning the reverbs will create space, right?
I’m not gonna say these are bad decisions per se, but what I will say is that using too much reverb, or going ham with the reverb and panning, is not the right decision. agaithiggoesessehavingng too many individual elements with different reverbs, too many reverbs, or too much wet signal. Reverb is a finesse tool that can help create depth and space in a mix.
However, what really creates space is each element having its own sonic space in the mix to begin with.

After that, start thinking about WHERE the mix is taking place. This will establish your single reverb, which will ultimately carry over to other return tracks that highlight parts of that room.
From there, it's best to remove your reverbs from all sources and utilize your return tracks for everything. This immediately gives you better control over your mix.
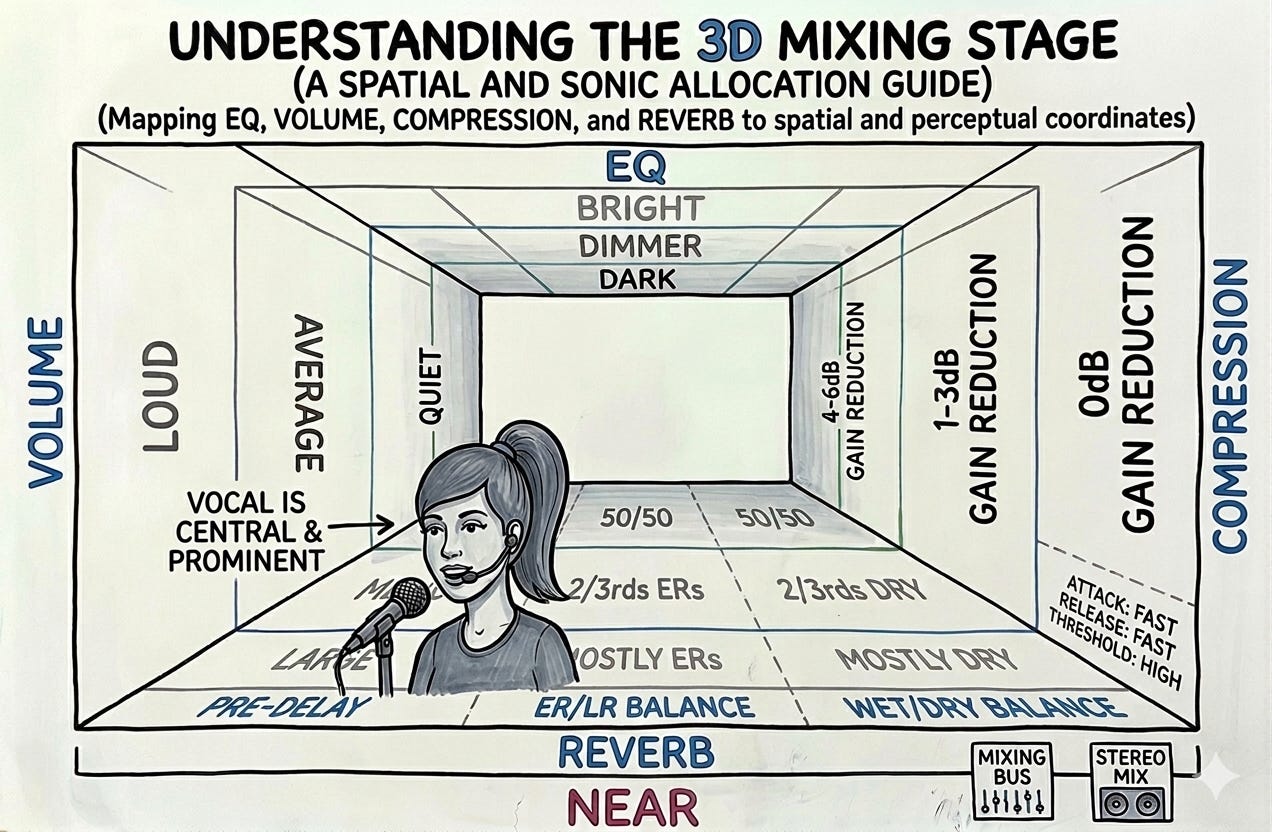
But reverb is only part of the equation; to accurately simulate what happens in the real world when we move closer to or farther from a sound, we have to make EQ, compression, and volume adjustments.
THESE things, in combination with reverb, create a realistic sense of space and depth in a mix.
I’ll admit, most of my early work was a wash in reverb, and what did I eventually do? You betcha!! high cut, and fly those instruments out!!! And honestly, it works!!
BUT, you can get a better effect, more control, and not have to fight against headroom when you know what you’re doing with just a few strong reverb choices.
Pro tip: Start working with instruments in mono; it adds more opportunity to layer sounds and pan them realistically in the stereo field. They always sound great with your reverb.
If this is clicking, you’ll want the Mix Clarity Pack, a simple single-page reference for MPC users, a simple Gain Staging Checklist, Headroom Reference, Mix Focus, etc.
Key takeaways from this post:
Pre-delay is the single biggest factor between muddy and clean reverb — start at 20ms and adjust from there.
Use reverb on a send/return channel, not as a direct insert, so you can control how much each element gets without stacking reverb tails.
Cut low frequencies from your reverb return — anything below 200–300Hz in the reverb signal is usually just mud.
FAQ
How much reverb is too much?
If you can clearly hear the reverb as a separate event after the dry sound, it’s probably too much. A good reverb sits underneath the mix — you notice it more when it’s gone than when it’s there.
Should I put reverb on my 808 or bass?
Usually no. Low frequencies build up fast in a reverb tail and create exactly the mud you’re trying to avoid. If you want the bass to feel roomy, try a very short room reverb with heavy low-cut on the return, or skip it entirely and create space with other elements.
What is pre-delay on reverb?
Pre-delay is the gap between the dry signal and the start of the reverb tail. It keeps the sound attack clean and punchy before the reverb fills in. Even 10–20ms of pre-delay can make a muddy reverb snap back into focus.
What’s the difference between send reverb and insert reverb?
Insert reverb sits directly on a channel and processes the whole signal. Send reverb routes a portion of the signal to a separate reverb channel. Send reverb is almost always better for mixing because it keeps the dry signal clean and lets you share one reverb across multiple elements.
How do I use reverb on the MPCXL specifically?
The MPCXL has onboard effects, including reverb, accessible per track or via the mixer. You can also use AIR Music Tech plugins as inserts or in a send/return configuration. Setting up a dedicated return track with an AIR reverb and routing sends from your drum and melodic tracks gives you the most control.
Quick-Start MPCXL Reverb Workflow:
1. Open your project in the MPCXL.
2. Go to the Mixer view and add a new Return Track.
3. On the Return Track, insert your preferred reverb plugin (for example, AIR Reverb).
4. Name this Return Track something like 'Main Reverb' so it's easy to find.
5. On any track you want to add reverb to (e.g., drums, vocals, synths), use the 'Send' knob to control how much of that track's signal gets sent to your reverb return.
6. Fine-tune your reverb settings: set pre-delay (try 20ms), keep decay under 1.5 seconds, and add a high-pass filter around 200-300Hz on the return to keep the mix clean.
7. Adjust the send levels for each track until the reverb sits just right in your mix.
This setup lets you dial in exactly how much reverb each element gets, keeps your dry signals untouched, and helps avoid muddy, washed-out mixes.
What reverb settings work for trap and hip-hop beats?
Short-to-medium decay (0.8–1.5 seconds), pre-delay of 15–30ms, and a low-cut on the reverb return around 200–300Hz. Snares and claps can handle a little more decay. Hi-hats usually don’t need reverb at all.
Why does my mix sound far away when I add reverb?
High wet mix level and no pre-delay are the usual culprits. Keep the wet signal lower than you think (sometimes 15–25% is enough), add pre-delay to protect the attack, and make sure the dry signal has good presence before reverb is applied.
Can I use the same reverb on every element?
You can share a reverb return across elements by using different send levels — drums get a little, melodics get a bit more. But some elements benefit from a different type of reverb entirely. A room reverb on drums and a hall or plate on a pad can help them sit in different spaces, even within the same mix.


What’s your reverb struggle? Drop it in the comments — whether it’s mud, wash, or just not knowing where to start, I read every one.
📬 Subscribe free to Practical Audio Lab — production technique, MPCXL workflows, and home studio clarity for producers who are serious about their sound.
🎛️ Grab the Mix Clarity Pack — four single-page references to keep your sessions focused and your mix clean. Free with subscription.
📲 Find PAL on Instagram and Reddit — I post quick tips and session breakdowns between posts.